
Introduction
Although MakuluLinux is very easy to install there can be situations where things can get tricky, or where some thoughts should be given to some configuration options before starting with the installation. This guide should help with that.
Things to think about are, will you be installing the OS as the only OS, is it going to be a PC with the new UEFI BIOS, or with a conventional BIOS, or can the BIOS be set to boot either to Conventional or UEFI mode? Do you want to separate the User Data from the rest of the OS (this makes backups simpler, and it also simplifies the reinstallation or upgrade of the OS if a new version is released, as a fresh installation doesn’t touch the data if done properly).
Or will you be installing the OS in a multiboot system with other OS’s installed? If one of the other OS’s is an m$ Windows, will you be accessing the Data of the Windows system?
Also, before you can start you will need to either burn the downloaded MakuluLinux iso file to a blank DVD, or better, put it on a USB stick. If you are already running an Ubuntu/Debian based Linux, I recommend using the tool called “USB-Creator” to create the bootable USB stick. This tool has the advantage that you can use it to put several iso’s onto one stick, all the other Linux based tools I know of can only have one iso on the stick.
If you are currently running Windows, then “WinSetupFromUSB” is the best tool, as also this one can have more than one iso, including Windows iso’s. If you are using this tool, make sure you tell it to format the stick for FAT32.
http://www.winsetupfromusb.com/
Once you have the USB stick or DVD ready, make sure your PC is set to either have the DVD first in the boot order, or the USB stick.
Installation as the only OS
This is pretty straight forward. If your PC supports both UEFI and conventional BIOS booting, make sure it is set to boot into BIOS mode. If you have booted in BIOS mode, the MakuluLinux Boot menu of the USB stick or DVD will look similar to this:

If you compare the above image with the one in the Installation Guide for UEFI PC’s, you will notice it looks quite different. This is one way to make sure you booted correctly. Once the system has booted, double click on the “Live Installer” which is on the Desktop

The first Window that pops open when you start the installer shows what the Password is. Many people don’t seem to read this and ask what the password is, so here you can see it again, it is makulu
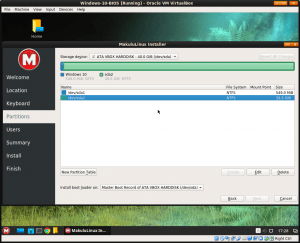
At the next windows you are asked to input that password. Now you can select the language you want the installer to use. Once you have that click on “Next”. Now you get asked for your Region and Time-Zone. You can also select the language you want the OS to use once it is installed, and how numbers and dates should be formatted. When satisfied with those settings click on “Next”. Now select your keyboard layout and click on “Next” when done. This Window now allows you to select destination disks (if your PC has more than one), and also offers options like “Erase Disk” or “Manual Partition”. You should also see a “BIOS” in front of the “Select storage device”, like in the image below:

If it doesn’t show BIOS, but rather EFI, then your system has booted in UEFI mode rather than Conventional mode. If that is the case reboot and go into your BIOS to make sure that you are booting to Conventional mode.
If BIOS is shown, select “Manual partitioning” and click on “Next”. Now click on “New Partition Table:

And then select “Master Boot Record (MBR)” and click on “OK”.

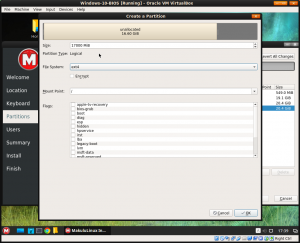
Next select the “Free Space” and click on “Create”. This will be for the OS partition, for which I usually suggest around 20 GB if you are going to use other partitions. If you won’t be using other partitions, subtract the amount of RAM your PC uses from the total space and use the number you get for the partition size. For the “Partition Type” select “Primary” For the “File-System” select “ext4”, and for the “Mount Point” use /.

If you are going to have more than 4 partitions on the same disk, you will have to first create an Extended partition, as MBR disks can only have 4 Primary partitions (the extended partition counts as a Primary partition, but can contain many “logical Partitions”, so that enables you to overcome the 4 partitions limit). Select the Free space, click on Create, For “Partition Type” select “Extended”, then click on “OK”.

Now select the “Free Space”, click on “Create”, and for “File System” select “linuxswap”. You will also notice that under “Partition Type” it is now “Logical”

If you want to use other partitions, for example for data, you can also create them here. Generally I suggest using “ext4” as the File System, and you can for instance use /mnt/Data for the Mount Point. When done, Click on “Next”. Now you setup the main user account The Name is a description of the User that is shown at the login screen, while the login name is the actual user account’s name. The name of the Computer describes the PC and should differ from other PC names if you are networked. Add the password, and decide whether you want the other options selected or not. When satisfied, click on “Next”.

The next view shows you a summary of what you have selected, here you have a last time to see if everything looks good, if not you can use the “Back” button. Click on “Next”.

The installation will now proceed.

When finished you can enable the “Restart Now” button and click on Done.

Make sure you remove the DVD or USB stick when the PC is rebooting. The system will now boot to the freshly installed OS. One of the first things you should now do is open the “Settings Manager” or “System Settings”.
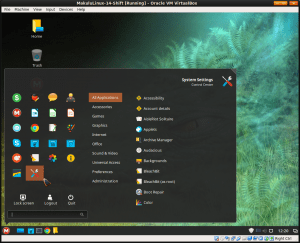
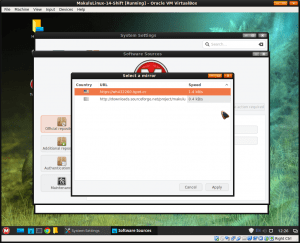
Navigate to “Software Sources”, confirm with the Password you setup during the installation, in “Mirrors” click on the field with “Main”

and select the mirror that shows the higher speed. Repeat this for “Base”. When that is done, click on “Update the Cache”.
Now click on the Package Updater icon in the panel, it looks like a shield, and if there are updates available it will show a white “i” inside a blue circle (just under the mouse pointer in my screenshot below):

Again enter the password, then you get a list of the updates. You can then click on “Install Updates”.

The updates are then downloaded and installed. Sometimes, depending on what gets updated, you may have to answer some Questions during process:
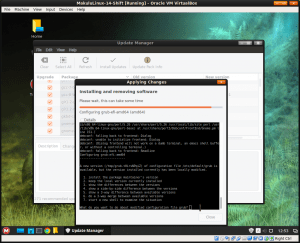
For example in the above situation it is usually best to select “2. keep the local version currently installed”. Once the system is up-to-date, you can install software easily using the Synaptic Package Manager. Updates should be applied regularly to keep the system secure.
Installing for Multiple OS’s if a Second Hard-Disk is present that can be Dedicated for MakuluLinux
The easiest way to setup such a system, would be if you have a 2nd HD available which you can dedicate for the installation of MakuluLinux. It ensures that there is no risk of corrupting anything of your other OS, for example Windows, and also Windows will have a harder time to corrupt anything on the Linux side, for example it’s boot-loader. If you can do it this way, first make sure your disk with the current OS is physically disconnected from the PC. Then just follow the above instructions for installing MakuluLinux to a BIOS system as the only OS.
Once the installation is finished and everything is running, shut the PC down and reconnect the Disk with the original OS. Now in the BIOS go to the boot priority settings and make sure the Disk with MakuluLinux comes before the Windows Disk in the Boot Order.
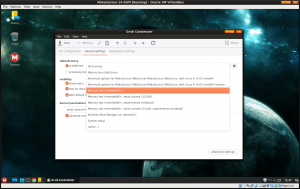
Now reboot and MakuluLinux should come up. When done, open the “Grub-Customizer”, give it some time until it has read in your configuration. Now you should see something like “Windows” listed as one of the boot options.

Now you can click on “Save”, and when that has been done, reboot. Your boot Menu should now include Windows and if you select that the PC will boot into Windows. With the Grub Customizer you can also change the default OS your PC should boot into. That is in the “General” tab under “Default Entry”, or you can also change the timer setting, for example from 5 to 10 seconds so you get more time to select the OS you want to boot into.

Installing for Multiple OS’s if the same Hard-Disk has to be shared among all OS’s
If you can’t add a 2nd Disk dedicated to MakuluLinux, then of course this can also be done, but there is some risk involved, so you should be careful and also make an extra backup of your current System before starting.
You will also have to check the current partitioning of your Disk As MBR disks only support a maximum number of 4 Primary partitions, you could be at a limit here. So you need to check if how many primary partitions are already setup on your disk. Many PC’s from manufacturers such as HP, Dell, Lenovo etc., that come with Windows already installed, have a recovery partition from which the OS can be reinstalled to factory defaults, then there is a small partition Windows created, the partition for the OS itself, and an additional one for backup or similar, so often already all possible primary partitions are used up. If that is so, you will have to delete the backup partition for example, then create an extended partition in it’s place, and within that a new backup partition which is a “Logical” partition, and then you can restore the data of the deleted partition to this. Extended partitions are special as they can contain many “Logical” partitions, and that overcomes the 4 Primary Partition Limit. The Extended partition itself counts as a Primary partition.
After that, You start in the same way as I described at the top where you install the OS as a single OS to a BIOS PC, until you get to the partitioning area.
Here you will see more options available than in the single OS installation, but again make sure it says “BIOS” in the select storage device, and click on “Manual Partitioning”.

On the Next Window you will see how the system is currently partitioned. If you don’t have any Empty Space, you will now first have to shrink the size of one of the Windows partitions. For the click on the partition you want to shrink and click on “Edit”.
Now you can reduce the size of the partition either by grabbing the end of the partition and pulling it inward, or by editing the size.

Now select the “Free Space” and click on “Create”.
Now you can select the “Free Space” under the “Extended” Partition and click on “Create”.

Again subtract your RAM from the size, File System ext4, Mount Point /, and notice that as partition type it is a “Logical” partition.
Next click on the rest of the free space and create your linuxswap partition there as in the single OS installation. After this the rest of the installation goes the same as earlier. Windows will be added automatically to the Boot Menu.